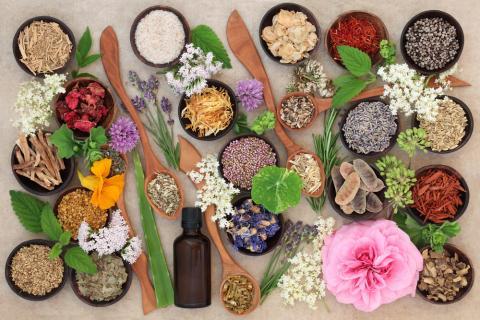
Many do it yourself herbal beauty and health products start with herb-infused oils. From lip balms to massage oils, the backbone of any herbal, oil-based product is a well-infused oil. While essential oils add a particularly aromatherapeutic effect, herb-infused oils tend to add a more deeply healing quality to your herbal products. It is important to do a little research to find out the best type of oils to use for your goals, along the with effects of the herbs you will be using.
There are some herbs that are quite common to use when making an infused oil base:
These herbs can serve as the foundation for a number of beauty and health products from face creams, hand salves, and antiviral ear oils. Research the herbs you want to use, and make sure they are the best choice for the product you will want to make. Some herbs are more effective when used as an essential oil.
There are some oils that are commonly used for these products:
- jojoba oil
- evening primrose oil
- coconut oil
- olive oil
- almond oil
- apricot oil
- castor oil
Each of these has specific uses and effects. You should choose the oil you use based on the product you want to make and the intended user of the product. If, for instance, you are making yourself a face cream, and you have very oily skin, it would be best to use jojoba oil rather than coconut oil as the base for your cream.
Try these suggestions:
- Face Oils: jojoba, evening primrose
- Body and Hand Oils: coconut, olive, almond, apricot kernel
- Lips: castor oil or any of the oils for facial use
How To Infuse Herbs Into Oils
There are three main methods to infuse herbs into oils: slow heat, solar, and cold infusion (aka, time). All these methods require a clean, good quality jar with lid, the appropriate amount of dried herb (appx. 1 ounce of herb per 8 ounces of oil), cheesecloth for straining, and oil.
Slow Heat
Within the category of slow heat infusion methods are four sub-methods. The choice of which method to use is based on your available tools as well as the herbs that you are using. Don’t get too caught up in having exactly the right tools for the job, however. Sometimes whatever tools you have on hand are the best.
- Yogurt maker/slow cooker: Using slow cookers to infuse your oils are one of the easiest slow heat methods because you can put your oils together and walk away until it is done. Simply place the herbs in your clean jar, pour in enough of your carrier oil to cover the herbs, and place the jar in the yogurt maker for 8-10 hours. If you are using a slow cooker, place the jar into the cooker and fill the pot with water to about the halfway mark of your jar. Place the heat on low and leave to heat for 8-10 hours. Let the oil fully cool before straining.
- Double Boiler: Place enough water in the bottom pot of the boiler to be able to simmer for at least 45 minutes. In the top pot place your herbs and pour enough oil over them to be able to cover them. Bring water to a boil and then reduce to a simmer. It is very important to avoid making the oil too hot or you will begin to fry your herbs instead of extracting their constituents. Allow the herbs to heat in the boiler for 30-45 minutes. Let cool and strain.
- Oven: Preheat your oven to 250 degrees F. Pour your herbs in an oven appropriate bowl and cover with oil. Place the bowl in the oven, and immediately turn the oven off. Leave the bowl in the oven for 24 hours.
- Stovetop: The stovetop method is useful only for herbs that can be infused very quickly such as turmeric or cayenne. Otherwise, I find this method too hot to be the most effective method. It is, however, the simplest method. Place your herbs in a small sauce pan and cover with oil. Place over low heat and let simmer for 10 minutes.
Solar
Solar is the best method to use for herbs with constituents that are resilient to UV rays and need a little heat to infuse well, such as calendula. Put your herbs into a clean jar, cover with oil, and place the jar in an area that receives mostly sun during the day. Leave in that spot for 3 weeks at minimum before straining and storing.
Cold Infusion
Perfect for delicate herbs such as lavender or chamomile that need to retain their aromatic qualities, cold infusion is the simplest infusion method. Place your herbs in a clean jar and cover with oil. Place the jar in a cool, dark place and leave for 6 weeks at minimum.
Lastly, Strain & Store!
Once your herbs have infused in the oil, place a sieve or a cheese cloth over a bowl. Carefully pour the oil and herb into the sieve/cheesecloth and strain the herbal particles out of the oil. If you are using a cheesecloth, gather the sides together with the herbs in the middle. Twist the top shut and then squeeze the oil out of the herbs.
Once your oil is collected, you can use it right away for making lip balms, deodorants, salves or any other product. If you wish to store your oil for later use, just make sure to use a clean jar. Close the top tightly, and store in a cool, dark place until you are ready to use it.
Try These Herb-Infused Oil Combinations
- Calendula and apricot for base of general skin cream or balm. Use cold infusion.
- Lavender and almond for soothing massage oil. Use solar infusion.
- Castor and comfrey for base of lip balm. Use slow heat.
- Rosemary and almond for stimulating massage oil. Use solar infusion.
- Plantain and coconut for hand salves. Use slow heat.
- Jojoba or primrose and calendula for face oils and creams. Use cold infusion.
- Olive and garlic for ear infections and colds. Makes an ear oil. Use solar infusion.
- Arnica and almond or coconut for soothing bruise oil, salves, etc. Use solar infusion.
- Cayenne and turmeric with coconut oil for inflamed joints and sore muscles.
- Peppermint and apricot for a cooling skin oil that is good for insect bite relief and headache relief.
Knowing how to infuse the goodness of herbs into oils will open up a world of herbal lifestyle possibilities for you. If you get to know a few more herbs and their uses, you can start to make combinations for products specifically designed for your needs. While it can be intimidating to start these projects, it is definitely worth the effort for the pride and connection you get from making your own beauty and health products.