The Suryanamaskar is a great exercise for any age, and any weight…
We’ve already talked about the physical as well as mental health benefits of practicing the Suryanamaskar or the sun salutation—a series of 12 poses which, when done correctly, can burn upwards of 13 calories per set. However, due to the hype and complexity of the movements of the sun salutation, the elderly as well as the obese tend to shy away from it. It is often erroneously believed that doing the Suryanamaskar is very strenuous—that’s not true. The sun salutation can be adapted according to your fitness needs. As long as your health allows it and your doctor gives you the go ahead to do yoga, age and weight are immaterial to practicing this health-enhancing set of asanas (poses). Here, we’ll discuss ways to make these poses more accessible for everyone!
Before You Begin
There are certain things to keep in mind before you begin any exercise, and so it is the same with the sun salutation, too. While this is true for everyone, it is of utmost importance to the seniors…
- Get a go-ahead from your doctor: There are certain contra-indications to the Suryanamaskar—anyone suffering from joint, renal, cardiac, or hernia disorders should avoid it, as must pregnant women and people with hypertension, ulcers, and vertigo. Always remember to get a formal go-ahead from your health care provider, especially if you are facing any health issues such as broken bones, torn tendons or ligaments, injuries, or any other disorders.
- Start with an empty stomach: Since the sun salutation is ideally supposed to be done near sunrise, make sure you start doing it on an empty stomach and a clean bowel. This exercise puts a lot of pressure on internal organs, so it’s the most beneficial when the stomach and the intestines are empty and at their smallest size.
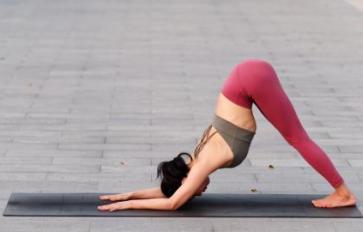
- Use a yoga mat: The asanas of the sun salutation are primarily floor-based ones, so there’s a lot of floor pressure involved. Thus the sun salutation is best done on a non-skid yoga mat or if you feel up to it, on lush grass.
- Do some preliminary stretches: While the sun salutation itself is a stretching exercise, it may end up cramping your muscles and straining your joints if you are not warmed up enough. Begin with some basic stretching and bends before you move into the sun salutation.
- The smile-o-meter: Remember to smile while doing the asanas. If your smile is turning into a grimace, stop and ease off. There is a certain discomfort that comes with beginning any new exercise routine. With the elderly, it’s best to err on the side of caution. Don’t try to emulate the teacher, be they physical or virtual. Do the sun salutation at your own comfortable pace—start with doing just two, then move to four. Do more when your body tells you that it is time.
Simpler Asanas
We know that the Suryanamaskar is a set of 12 asanas. Each of these asanas can and should be adapted to your current fitness levels. Remember to choose a teacher or a video that’s actually meant for your age and fitness level rather than for 20-year-old expert yogis. There’s an excellent video on YouTube that incorporates a lot of stretching into a simple, slow sun salutation, performed by a silver-haired senior, Norman.
- Take your own, sweet time: While a sun salutation set can typically take between 1.5 to 3 minutes, we suggest you go as slowly as possible. There’s no race; you can and should take your own time doing it to avoid any strains and pains.
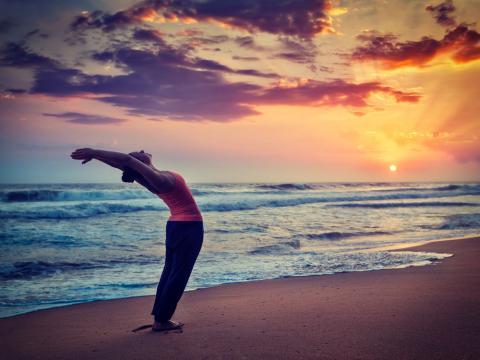
- Bend only as much as you comfortably can: Step 1, the prayer pose is simple—all it involves is standing straight with folded hands. Steps 2 and 3 and then steps 11 and 10 are the forward and back bends, respectively. For the elderly, it’s best to bend only as much as is comfortably (and painlessly) possible. Don’t try to touch your toes forcibly or bend back to the amount of pain.
- Take some support: We suggest you place the yoga mat parallel to a bed or a rail—this way, anytime you feel the need to balance yourself, you have something to hold on to. Also, in the equestrian pose of step 4 and step 9, while the original demands that your hands be on the floor on either side of the bent knee, seniors can begin by placing both hands on the knee itself and doing a slight backbend.
- Skip a pose if it stresses you: If a pose or asana is making you stress too much, skip it in the beginning, or find an easier alternative.
- Break the transitions into smaller steps: Since the sun salutation is a series of 12 asanas, there are many transitions in it that bring you from one step to the other. These transitions should be done slowly, one movement at a time. One prime example would be step 6, the eight-limbed salutation. For seniors, it’s advisable to first lower their knees, then the chest and finally the forehead. Similarly the transitions between the forward bend and the equestrian pose (and vice versa) need to be slow and steady.
Finally, remember that it’s really not about age or weight, but about fitness levels. We all have to remember that there is only way of doing the Suryanamaskar correctly, and that depends on our individual comfort level. What comes naturally is fine—never force your body to accommodate stubborn fitness goals for that would have a detrimental effect on you and your body.
If you have any yoga hacks to share with us, please write to us in the comments section below…