We are now well into Spring, and the kiddos are starting to be released from school for summer vacation. Now is a great time to get your little ones involved with some nature-based crafts that will benefit both their creative spirits and the outside world! The following crafts can be made at home with materials found in the backyard, recycling bin, and even your local park.
Pinecone Birdfeeders
As the song birds return from their winter retreats, it is a fantastic idea to give them a little snack to help them on their way. These little pinecone feeders will attract different birds depending on the type of seed you use. They are big enough to attract the birds you want to see, but small enough so that creatures you do not want to come into your yard (such as bears and rodents) will stay away. (Here’s more on how to attract certain birds to your yard.)
You will need:
- any type of pinecone, preferably with open scales
- your preferred type of nut butter, preferably a no-mix variety
- a spreading knife
- small birdseed, such as golden millet, red millet, and flax
- yarn or twine
Directions:
1. Lay out some newspaper to keep your work area clean.
2. Cut about three feet of yarn or twine (depending on how far you want your birdfeeder to hang) and tie a loop around the top couple of layers of the pinecone scales.
3. Using the knife, spread a thick layer of nut butter around the outside of the pinecone, filling in the cervices enough, but not so much that the nut butter will begin to drip out of the holes.
4. Place the bird seed in a bowl and roll the pinecone in the bird seed until it is thickly covered.
5. Select a tree and hang your bird feeder so that it is at least five feet from the ground. Be careful in the hanging process! This is an adult-only job. Lastly, enjoy watching the little birds feast on your creation.
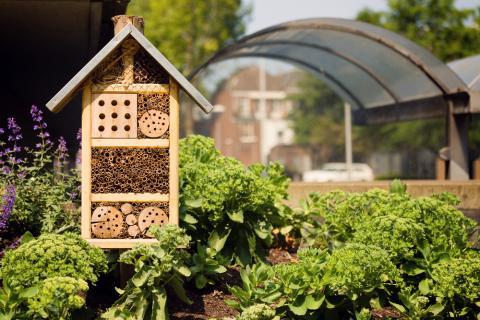
Bee Houses
Most of us can agree that honeybees are important to our ecosystem. But let’s not forget that there are all kinds of bees and pollinators out there. Bee houses are a fantastic way to attract a high variety of pollinators into your garden to both improve its fertility and overall level of biodiversity. Making bee houses are also a fantastic way to educate your little ones about the role of pollinators in the world and our lives! For instance, without all the different pollinators out there, we would not have delicious strawberries or beautiful flowers to enjoy. There are many different ways to make bee houses, depending on the bee you want to attract. Here are the directions for making a bee house to attract mason bees. (Here’s more about attracting pollinators to your yard.)
You will need:
- a slightly shaded corner of the yard or garden
- a block of untreated wood (even a section of a log will do!), approximately 6-12 inches cubed
- a drill with a 5/16th-inch drill bit
- honey water
Directions:
1. Using the proper safety measures, drill a series of holes on the face of your wood block anywhere from 3-5 inches deep, depending on the depth of your block. Do not drill all the way through the block, as you are drilling the hole to make a little shelter for the mason bee. It only needs one doorway! You can drill holes approximately an inch apart from each other. The more holes, the more bees, but make sure you give them enough space from each other to be respectful neighbors. This is an adult job, but an excellent opportunity to introduce your kid to the proper safety procedures when using power tools.
2. Place the newly drilled bee home in a slightly shaded (but not too shaded) corner of the yard. This will be where it stays until you move it again in November.
3. To attract the bees to the house, pour highly diluted honey water over the entrances. Be sure to watch over the coming weeks to see if little bees are going and coming from their new home!
Flower Pressing
This is a classic craft that is especially fun during mid-Spring, when there are a high variety of wildflowers blooming. It is a great way to start teaching your child and yourself about common wildflowers—and doubles as a craft that can be turned into a gift. For instance, the finished pressing can be made into a card or a window decoration. Go for a walk with your kiddos, down the street or to your local park until you spot an area of wild flowers. When collecting flowers, be sure to practice honorable harvesting and Leave No Trace methods. For instance, only collect what you need, and be sure there are plenty of flowers left. That way there will be flowers for everyone to enjoy, including the pollinators mentioned above! Here are some additional foraging ideas for when you are out there.
You will need:
- a variety of delicate flowers that can easily lay flat
- waxed paper
- a couple heavy books
Directions:
1. When you get home from your foraging, cut a sheet of waxed paper to start laying out your pressing design. Be careful to arrange the flowers in exactly the position you want them, because once they are pressed they stay that way.
2. Once you have arranged your flowers on one side of the waxed paper, fold the paper in half, covering your design. Carefully open one of the heavy books toward the middle, sliding the waxed paper with the flowers between the pages. Close the book and leave on the table or another storage area. After about three to four days, you can open the book up again and see the beautiful design you have created. You can tape the edges of the waxed paper together and hang the design in a window for a stained-glass effect, or glue it to the front of a folded piece of paper to make a card.
Happy Crafting!