It does not take a lot of glitter to make craft time special. You can source many fantastic crafting materials both from the recycling bin and the outdoors! When you are looking to stimulate your child’s imagination in the outdoors, these crafts can help you out.
Build-a-Bug
This is a great option for rainy days, when it’s not as easy to go collecting natural objects. This upcycled craft helps teach you and your kiddo about insect anatomy, while letting their imagination take flight! You can give your little one a basic lesson on insect anatomy to help guide them. For instance, insects have six legs, three on each side. They usually have antennae that they use to sense their surroundings. They can have as many eyes as you want them to have! They have three body parts: the head, the abdomen, and the thorax. Some insects even have wings! (Speaking of bugs, here is a way to keep biting bugs off your little one the natural way.)
You will need:
- an egg carton cut to only have three egg holders in a long line or toilet paper rolls
- a variety of crafty supplies, such as (but not limited to) googly eyes, pompoms, paint, feathers, yarn
- pipe cleaners
- hole puncher
Directions:
Give your kiddo one egg carton as a base. Explain to them that insects have three main sections in their body. You can ask your child to point out and feel their own body parts in contrast to the bugs as you explain. Start with the head. You can say, “All insects have a head, just like you! Where is your head?” Then have them create the head of the bug. Bugs have eyes just like us, too, although they are not the same as ours. They have compound eyes, which is like having many eyes all on one eyeball!
Next introduce the thorax. The thorax is kind of like our shoulders. Roll your shoulders around to really feel them. “This is where certain insects have wings. Can you imagine having wings coming out of your shoulders?”
The third part of an insect body is the abdomen. Rub your hands on your tummy, the human abdomen. “Imagine you have patterns along your tummy. What would you want them to look like if you were a bug?” Allow your child to decorate the abdomen of their bug as desired according to this guidance.
Lastly introduce the legs. “We humans only have two legs and two arms, but insects get six arms/legs total! Maybe that’s why they can walk so quickly.” Punch holes in the sides of the egg carton with the hole puncher and wrap a short length of pipe cleaner around them to be bent in whatever leg shape your child wants. (For more information on insect anatomy, follow this link.)
After guiding your child through the anatomy of the insect, let them get creative with the extra body parts they might want to build on their bug. It does not have to be exactly like real life! Have fun with the imagination side of things. For instance, you can say, “Insects on planet earth are built this way, but not all bugs are built this way. What if there are bugs and insects on Mars? What do you think they would look like?” Get your child’s wonder and imagination going through this project.
Once all the glue has dried, follow up with some free imagination time. Maybe use the pipe cleaners to make a crown of antennae. Do this by making a pipe cleaner crown, wrapping the ends of two lengths of pipe cleaner around each other. Next take two other pipe cleaners and wrap their ends perpendicular to the crown, building antennae. You can even add face paint to complete the effect. Ask your child to imagine that they are a bug and let them roam around with the bug friend they made, imagining the afternoon away.
Natural Mandalas
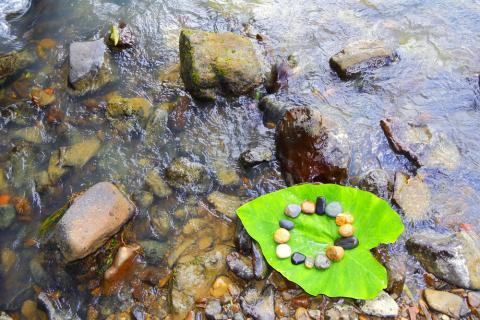
Building mandalas out of natural materials is a great way to get your child interacting with the natural world while building their meditative capacity. Go for a walk to your yard or local park and go on a scavenger hunt for various natural items. For this craft, it would be best to select items that are not living, on the ground, and not attached to anything, such as dead leaves, sticks, and rocks. That way, we can leave the living things to go about their business making our world more beautiful. (Have a teenager? Here is a simple introduction to meditation just for them.)
You will need:
- a variety of natural objects, such as dead leaves, sticks, stones, and pinecones
- a flat-ish area
- a camera
Directions:
Find a flat, smooth area to work, such as a boulder, a driveway, a short lawn, or a patch of sand. You can even work in a stream! Show your child pictures of mandalas. Explain how they start from the middle as a center piece. Perhaps a center piece could be a simple, beautiful stone. You then build off the center piece in circular layers. Perhaps a series of leaves laid with their tips facing out from the rock, followed by a line of thin sticks in a circle. Then you could sprinkle a layer of pine needles around the sticks. You can be as creative as your mind and the objects around you. Take a picture of your creation from above to appreciate its synergistic symmetry and be sure to practice Leave No Trace principles and scatter the objects you collected. The building of mandalas can be very meditative. You can also easily do this activity at the beach in the sand! Bring the idea with you in every environment and see what you can build.
Mobile
Much like the natural mandalas, you can use many natural objects to create a wonderful addition to a room or porch. I particularly enjoy the long-term method of collecting a little piece of nature from all the places to which I travel—the beach, the forest, the mountains—and collect them all to make a mobile that represents me and helps me to remember all those beautiful travels and places.
You will need:
- a collection of natural artifacts (shells, pinecones, bones, rocks, leaves, etc.…the number of items depends on how big or busy you want your mobile to be)
- 2-4 sturdy, 1-inch diameter sticks, about 1 foot long
- 5-8 ft. yarn, twine, or fishing line, depending on whether you want the hangings to be visible or not
- a screw-in hook, to hang the mobile on the ceiling
Directions:
There are several ways to make mobiles. Firstly, you need to decide what you want your basic framework to be. You could lash together the ends of your sticks to make a triangular or square frame from which to hang your objects. You could choose one main stick to be at the top of the mobile and then hang smaller sticks off it at different levels to make a multi-staged mobile. Perhaps the most straightforward frame design is the cross frame where you take two sticks and wrap the twine around each side to form a joint between the sticks. (Here’s a great resource for learning how to lash sticks together.)
Once you have your frame, start attaching your objects to the medium of string you desire (twine, fishing line, etc.). You can have one object at the base of the string or you can attach multiple objects on one line. Tie the lengths off on the frame. Tie a hanging loop onto the frame, choose a place on the ceiling to screw in your hook, and hang that mobile up. You now have a beautiful talking piece, decoration, and memory holder, all in one.
Sometimes sourcing your craft materials outside of the craft store can require a little extra effort, but the benefits you and your child will feel from connecting with the natural world will make it well worthwhile. Nature based crafting also helps lower the consumption of wasteful materials, serving the earth. Just remember to be mindful about how and where you collect your crafting materials and have fun!